Setting up Vim Plugins on Windows
I've been using VsVim the vim Visual Studio plugin and I really like how much easier it makes coding when your fingers can live on the home keys more. Recently I started working through Roy Osheroves Vim Hates You course and learning loads more tricks and ways to use vim, so I thought I would put a bit of effort into learning vim int the console so that it might in the future it might become my main weapon of choice.
Preliminaries
I use ConEmu on windows at the moment. I've started scripting in powershell and trying to use the command line a bit more. As Im a .NET developer, I think Visual Studio is the best IDE to use for day to day coding, but for anything else there is the potential to use vim.
Vim Plugins
I found setting up vim plugin managers on windows a real pain in the arse last time I tried it. But following the instructions on Roy's course and using vim-plug it actually seemed really straight forward and worked first time.1. Install vim-plug
This is as simple as running the powershell script on vim-plug home page. This puts the Add in the plugin commands to your vimrc file.2. Configure vim-plug
In windows, instead of .vimrc its _vimrc, but you do still have access to the $HOME variable, hence the following line will open your _vimrc invim $HOME\_vimrc
Again, the documentation is good onthe vim-plug home page, but heres what I added in my _vimrc to get some of the more popular plugins setup:
3. Run PlugInstall
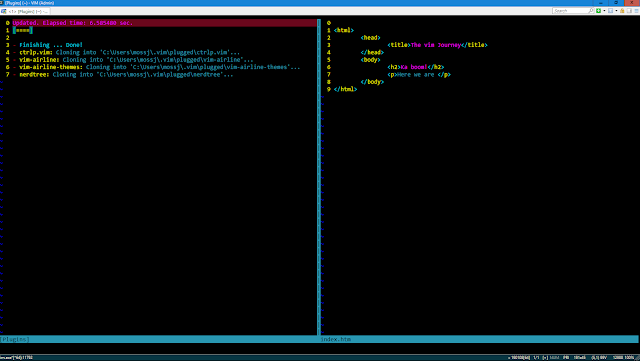
Once the plugin manager is downloaded to the correct directory and the configuration added to _vimrc, we now run the :PlugInstall command from with in vim. This will cause the vim-plug to initiate and download all the plugins install them to the appropriate directories.The right pane is the vim file I originally appended. Then run :PlugInstall and the left hand window opens and displays the progress of the install. On complete, type :qa to close all, and then open vim again. Now you have access to plugins installed.
Summary
The first time I tried to setup a vim plugin manager, it was a bit of a frustrating task. The VimHatesYou video series has been an excellent guide to help me get from novice to more advanced user and I was pleasantly surprised with how easily the vim-plug plugin manager just works. Nice and simple.And yes, I really need to sort my theme out, its making my eyes bleed.


