Getting started with EntityFrameworkCore
I while ago, I posted about setting up Entity Framework 6 Code First migrations in an MVC 5 Project. These days, its all about dotnet core, and whilst the process is very similar, I thought I would write another detailed walk through so that I can hit the ground running when I'm required to do this working on real projects.
Start off by creating a dotnet core API using Visual Studio 2017. Add a dotnet core class library to the project. For this tutorial I used dotnet core 2.2.0.
Reference the following nuget packages for BOTH projects. Make sure that you select the version that matches your dotnet framework version (e.g. 2.2.0)
Project Setup
Start off by creating a dotnet core API using Visual Studio 2017. Add a dotnet core class library to the project. For this tutorial I used dotnet core 2.2.0.
Reference the following nuget packages for BOTH projects. Make sure that you select the version that matches your dotnet framework version (e.g. 2.2.0)
- Microsoft.EntityFrameworkCore
- Microsoft.EntityFrameworkCore.SqlServer
And reference the following package for the Data project
- Microsoft.EntityFrameworkCore.Design
Finally, add a reference to the Data project from the Api project.
Add in an Employee, Department and Context class to the Data project and copy the code across from each of the classes listed below:
We also need to register the Entity Framework in the Startup.cs class. Add the following two lines to the ConfigureServices method of the Startup.cs class. Update the connection string to match your SQL Server:
Now we can run the powershell commandlets to create the migration and also create the database on the server. Open the package manager console by going to View -> Other Windows -> Package Manager Console. This console is a powershell terminal and the Entity Framework commandlets were installed when the EntityFrameworkCore Design nuget package was installed:
Add-Migration InitCreate
Update-Database
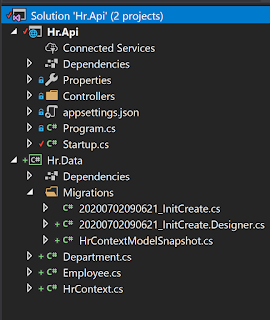
The add migration command will create the migrations and add them to your project and the update database command actually runs the migrations against the Sql Server, creating the database and associated tables. In the screenshot below you can see an outline of the solution so far:
Create the Model
Add in an Employee, Department and Context class to the Data project and copy the code across from each of the classes listed below:
We also need to register the Entity Framework in the Startup.cs class. Add the following two lines to the ConfigureServices method of the Startup.cs class. Update the connection string to match your SQL Server:
Now we can run the powershell commandlets to create the migration and also create the database on the server. Open the package manager console by going to View -> Other Windows -> Package Manager Console. This console is a powershell terminal and the Entity Framework commandlets were installed when the EntityFrameworkCore Design nuget package was installed:
Add-Migration InitCreate
Update-Database
The add migration command will create the migrations and add them to your project and the update database command actually runs the migrations against the Sql Server, creating the database and associated tables. In the screenshot below you can see an outline of the solution so far:
EntityFramework Core is now setup in the project and we can add a controller to the Api to get some of the employees out of the database. Obviously, the database is empty initially, but you can manually add some Employees in using Sql Management Studio. Add the following controller code to the Api project and run the solution. The employees that you manually added to the database will be returned in the api call:

